Now lets start the tutorial. How To Add Google Official Contact Form for Static Pages in Blogger.
- Switch to HTML mode from Compose Mode.
- Click on HTML in left top of the Page
- Copy the Following code inside it and Save
<tr><td>Name</td> <td>
<input class="contact-form-name" id="ContactForm1_contact-form-name" name="name" size="30" type="text" value="" />
</td></tr>
<tr> <td>
Email<span style="font-weight: bolder;">*Mandatory</span></td><td>
<input class="contact-form-email" id="ContactForm1_contact-form-email" name="email" size="30" type="text" value="" />
</td></tr>
<tr> <td>
Message<span style="font-weight: bolder;">*Mandatory</span></td><td>
<textarea class="contact-form-email-message" cols="25" id="ContactForm1_contact-form-email-message" name="email-message" rows="5"></textarea>
</td></tr>
<tr><td align="center" colspan="2">
<input class="contact-form-button contact-form-button-submit" id="ContactForm1_contact-form-submit" type="button" value="Send" />
</td></tr>
<tr><td align="center" colspan="2">
<div style="max-width: 222px; text-align: center; width: 100%;">
<div class="contact-form-error-message" id="ContactForm1_contact-form-error-message">
</div>
<div class="contact-form-success-message" id="ContactForm1_contact-form-success-message">
</div>
</div>
</td></tr>
</tbody></table>
- Go to Template -> Edit HTML
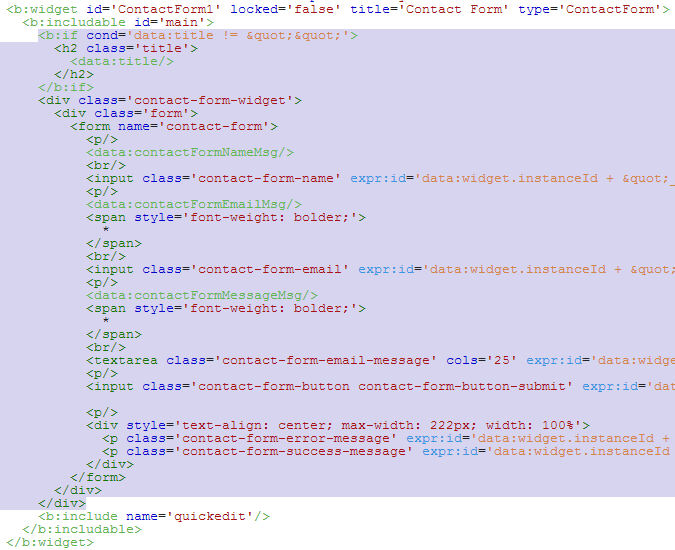
- Click on Jump to Widget and take Contact Form1
- Click on the arrow before <b:widget id="ContactForm1" locked="false" title=" Contact Us" type="ContactForm"> </b:widget></li>
- Delete the portion inside <b:includable id='main'> ........ </b:includable>
- Now Sidebar Widget will not appear.
- Click on Save
Thank you
Sign up here with your email


1 comments:
Write commentsThanks for this information. ProzoktiBd.com
ReplyConversionConversion EmoticonEmoticon